Projection mapping kit

Just a few pointers about essentials, such as computers, projectors and some peripherals. Having made some engaging audio-visual content is of course key in projection mapping, but knowing the kit available to you really pays off. Even with lower spec kit you can produce intriguing outcomes;  limitations can often spark creativity.

Know your bottlenecks

Starting projection mapping on a budget often means trying to use the available kit to its best ability, there is not much choice. So a few considerations maybe around how well the available computer’s CPU and graphics card can handle video and audio output, and to scope the project to produce the best possible quality using existing kit.

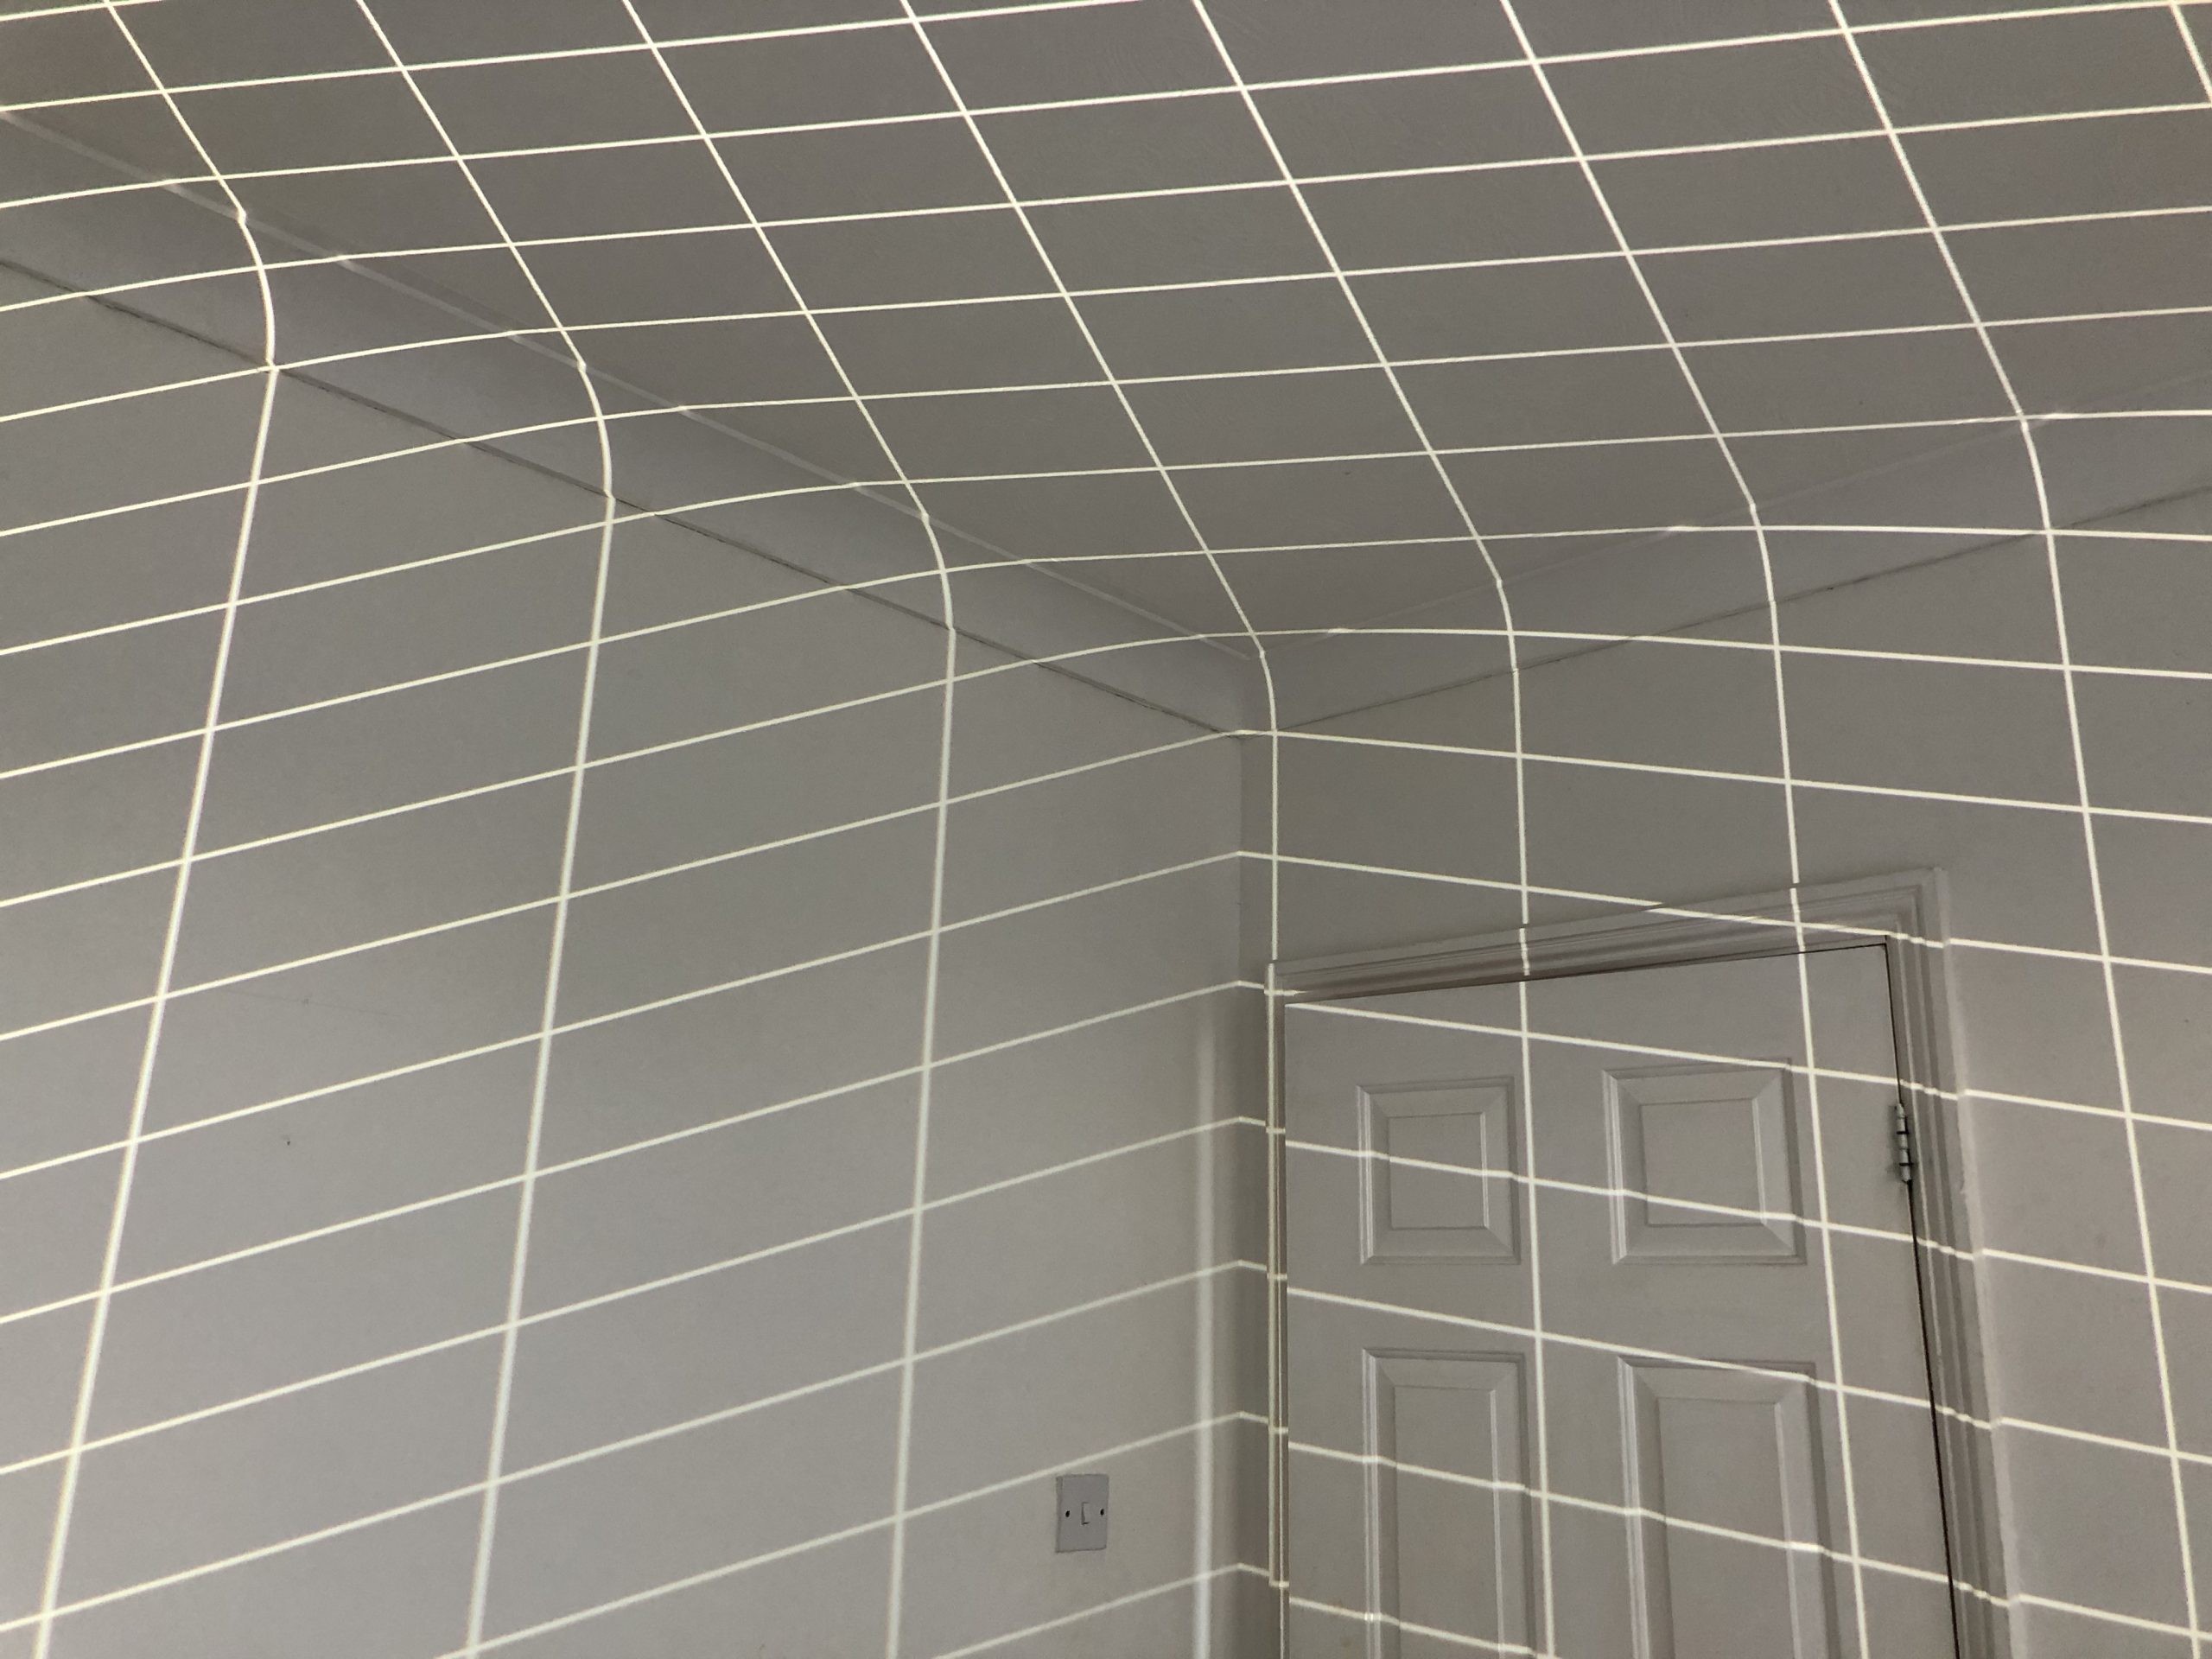
Some projection mapping software may be platform-specific, so establishing early on which computer and software will be used on the night avoids unnecessary re-working of content. And since the showcase could be planned for a playback or a live mixing scenario, it is important to test out early on what the comfortable CPU load is, to avoid computer crashes during the show.

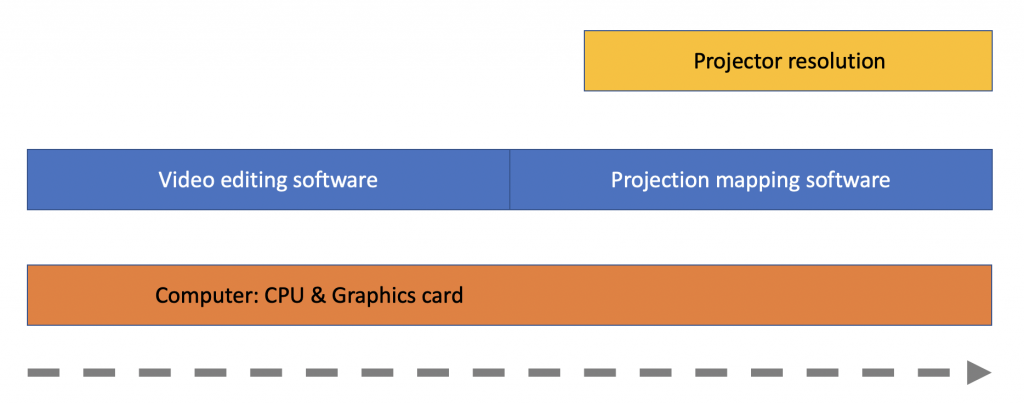
For low budget productions there are usually three potential bottlenecks: computer, software and projector. To maximise the quality of your work, you need to know your weakest link.

Computer: You could use a low-cost computer, like a Raspberry Pi,  a laptop or desktop computer (Mac or PC). CPU and graphics card restrictions apply during the preparation of content (video editing, compositing and rendering) as well as when delivering the actual showcase. 

If your computer does have a high enough specification, live rendering of several audiovisual sources at an event may be possible, if not then playback of pre-mixed video might just work. This decision will impact on your workflow as well as the mapping software you might use. When you are ready to scale up your work, you may want to look into media servers.

Software: if you go for the playback option, the CPU load happens mainly before the event. So you need good software to animate and render out the video materials and you need prep time. If you go for live mixing, the CPU load happens during the event and you need higher spec projection mapping software or a media server. Read more on software here.

Projector: the resolution of the projector delivering the visuals is the final bottleneck. Once you know its native resolution, you can work backwards, meaning you can record/render video materials at the resolution of the projector. This can reduce rendering time and CPU load, but you may not be able to re-use the materials for a higher spec project.

Projectors on a budget

Since companies, schools and universities often regularly upgrade their projectors, many become available second hand. This is not a bad start for projection mapping experimentation and small indoor projects.

A former classroom projector with a decent number of hours left on the lamp can get you started, as long as you can control the scale of the work and the lighting in the room you are working in.

For basic indoor projects, check:

  1. Brightness (ANSI Lumen) & lamp life
  2. Resolution

For basic outdoor projects (not Wembley arena):

  1. Brightness (ANSI Lumen) & lamp life
  2. Resolution – if possible go for 1920 x 1080 (1080p)
  3. Throw ratio

Brightness & lamp life

Generally speaking, look out for projectors with 3,000 ANSI lumen or better. For indoor projects you can drop somewhat below, as long as you can darken the space. There is more to it of course, but let’s just use this as a rough starting point and look at…

Lighting technology

Without knowing a bit about lighting units and technology (UHP, DLP, LCD, LED, laser) a projector’s advertised lumen number can be misleading. Lighting technology is important as it impacts on other aspects, such as bulb longevity (=projection hours left). You might be able to buy the second hand projector but could you afford its replacement lighting unit? Are they even still available? So here is an overview:

UHP (Ultra high pressure): this bulb emits a bright light, but gets dimmer over its short lamp life. Older UHP projectors tend to be heavy, slow, hot & noisy, cheap to buy second hand, but you need to factor in replacement lamp unit prices.

DLP
(Digital light processing) describes a projector that uses a chip to reflect the light. DLPs can use bulbs, LED or laser as light sources. 3-chip DLPs are very bright and expensive (think commercial cinema), 1-chip DLPs are only 1/3 as bright (think home theatre), but can use pixel shifting technology, which allows resolutions up to 4K.

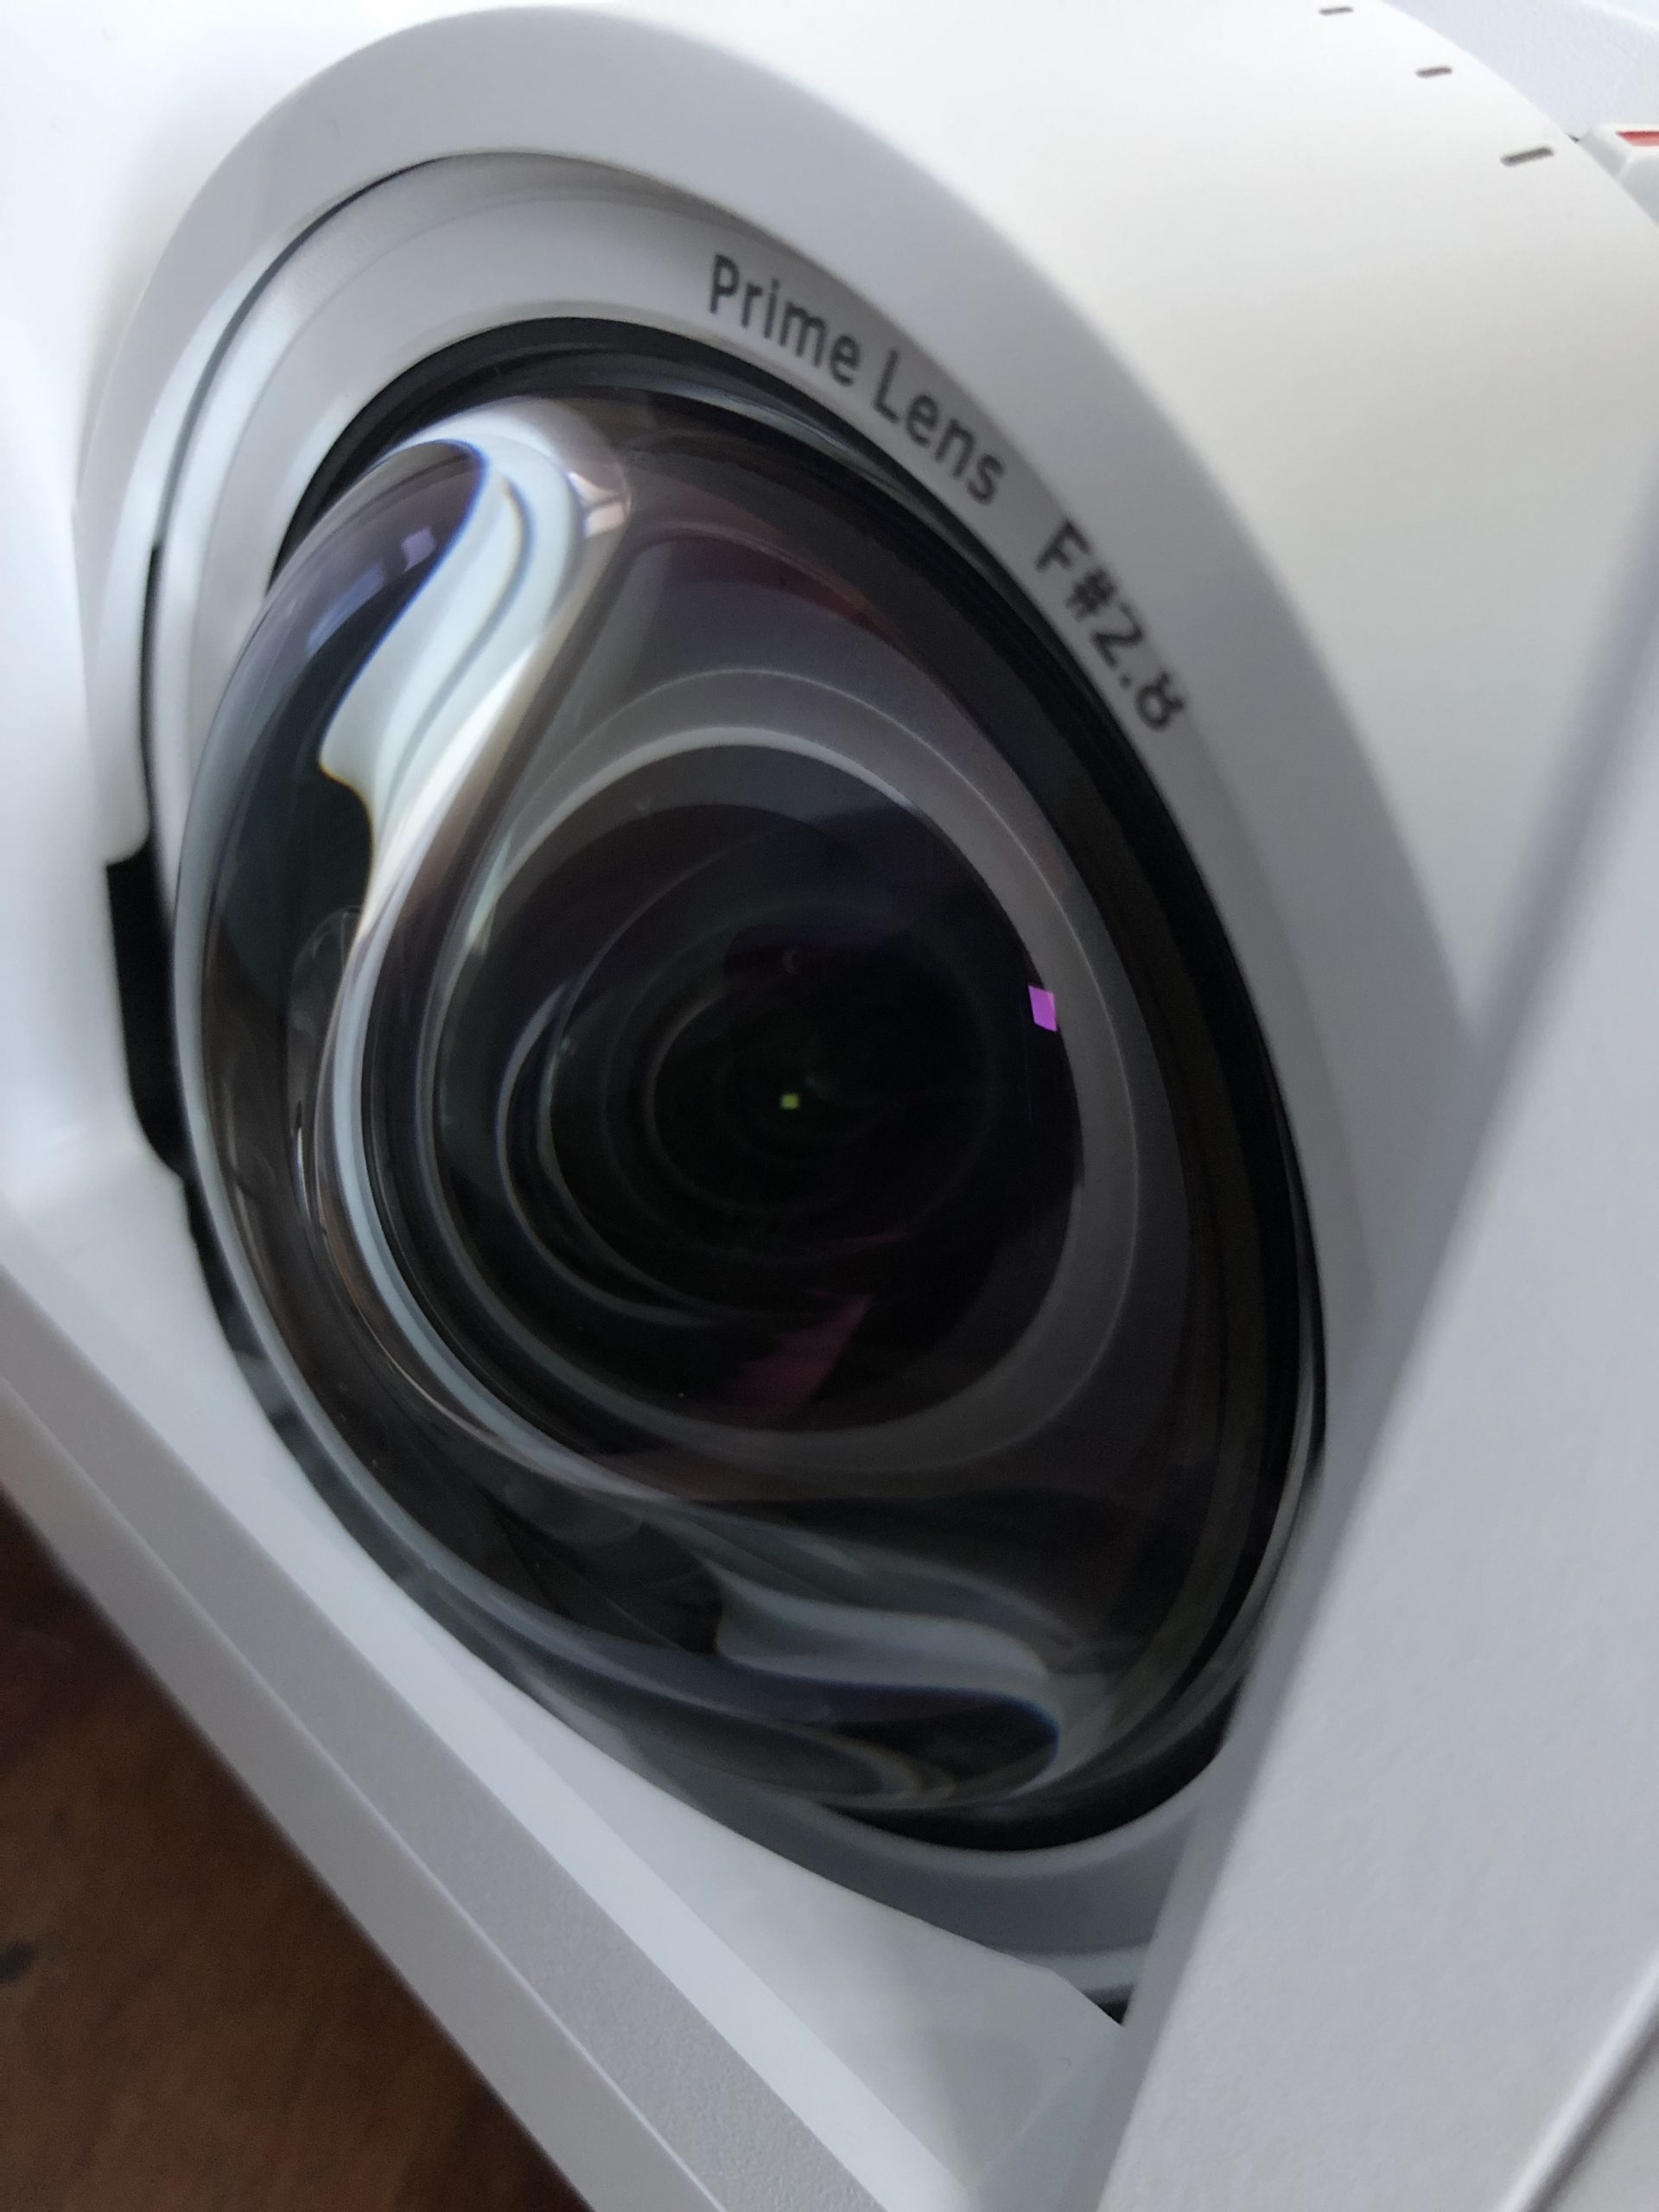
Using pico and mini projectors may sound tempting for indoor projection mapping as they are less expensive and easily transportable, but if they use LED 1-chip DLPs, their image is far less bright. So the advertised lumen number may not match your expectations. Compare the lens of a pico to a normal and a short throw projector. For pico think small!

LCD uses 3-chip technology, so a 3LCD projector has 3 times more colour brightness than a (1-chip) DLP projector. This makes them more expensive but suitable for small scale projection mapping.

LED projectors tend to be cool & quiet, light weight, long life, with a  sharp, but not super bright image. As some suggest, “an LED projector advertised at 3000 lumens is probably only 1000 ANSI lumens” (https://www.digitalpressworks.com/).

Laser technology is bright & sharp, robust, cool & quiet but unfortunately for starting projection mappers very expensive. Some  higher spec laser projectors may offer 45000 lumen 3-chip DLP technology, which make them suitable for large-scale outdoor events, but come at the cost of a car.

Resolution

SVGA = 800 x 600
XGA = 1024 x 768
WXGA = 1280 x 800
WUXGA/HD = 1920 x 1080
Ultra HD = 3840 x 2160 pixels
4K = 4096 x 2160 pixels

Resolution decides on the sharpness of the image, and level of detail you can project. Higher resolution is better but also more expensive. The larger the planned projection image is, the more noticeable a lack of sharpness becomes. So if you are projecting on small indoor objects, you may get away with less resolution, depending on the object and projection angle.

Also useful to know when comparing second-hand projectors:

  • Native resolution is built into the chip, supported resolution is the software upgraded version (see Brightness & lamp life).
  • Contrast ratio means the perceived difference between a white and a black projected pixel. Higher contrast is better.
  • The aspect ratio (4:3 or 16:9) may be less important initially, since mapping means you will only use a portion of the available picture. It becomes interesting when you combine projectors.
  • Some projectors shut themselves down every now and then to prevent overheating. Not good if this happens during your show, so getting to know how the kit you are working with is incredibly useful.

Remember to prepare the video content to suit the projector.  Working with higher resolution footage impacts on preparation stages, as it will require more computer processing power/ take longer to render. It’s not necessary to shoot 4K video material if the projector can only work in XGA, unless you plan to re-use the materials later on with a better projector. 

Throw

Let’s look at ‘normal’, ‘short throw’ and ‘ultrashort throw’ projectors. They are specified as a ratio, that tells you how large an image you can throw from a specific distance. ‘Normal’ throw  projectors are the cheapest and will do fine for small scale indoor projects, as long as the audience does not walk in the projector beam and block the image.

‘Short throw’ (0.5:1 or similar) comes in handy for this but also for basic outdoor work, as you don’t need be miles away from your object to get that larger image. Ultrashort throw can show up uneven surfaces (think pebble-dashed house render).

Other kit you may need

Sound equipment: Especially with older projectors there are further things to consider. They may not have a good enough speaker built in, so you need to output the audio separately from your computer. This is no bad thing, as the sound output from projectors can be quite poor. Older projector lighting units generate much heat and have a fan built in, so having sound of decent quality and volume is useful to distract from this. 

Rig: you will most likely need a projector stand of sorts, perhaps a piece of furniture, or a tripod with a custom-made cradle. It should be robust enough so the projector stays in position, otherwise your mapping will be out. Alternatively, the projector could be hung from a ceiling or rig.

Enclosure: when working outdoors you will also need weather protection for your projector, but remember projectors are hot, so the container needs to be spacious, with ventilation gaps. If you are worried about someone taking your projector, think about a lock.

Power source: when working outdoors, you will need a secure power supply, which needs to be ready for you when you start mapping. Carrying a 25 m retractable extension with you is a good idea.

Camera: having a camera with you might be useful, especially whilst you are mapping the shapes onto the object. Using the camera you can zoom in on say, the house corner to see how accurate your mapping is, without running back and forth. Alternatively, ask a friend to help you map.

Markers: carry some masking tape or spray paint with you to mark out the exact position of the projector on the ground. you may also need to mark down the position of the object.

Next steps

Apart from the projector and computer you will need content, a projection object and software, so let’s look at that next.

Back to Top